How to track forms using Facebook pixel and GTM
Author: Natalie Banks - Digital Marketing Specialist
By this stage, you will have already set up a Facebook pixel on your website, so these steps are solely focused on tracking your website forms when people click through from your Facebook ads. If you have yet to set up your Facebook Pixel, you can do so here.
Whether you have just recently started to run Facebook ad campaigns or you are just looking to better track your website visitors who arrived via one of your Facebook ads, you need to ensure you are correctly pushing events through to Facebook.
If you are a regular user of Google Analytics, you will see familiarities between how these conversions are set up, but unfortunately, there’s no way to import your Google Analytics goals into Facebook, so you will need to send events by using one of the setup methods we outline in this article
Once these events are being pushed through to Facebook and recorded correctly, you can then set up your conversions.
Events
Events are simply a series of data pushes from your website when a particular action occurs. These actions could be a page view, a form submission or even just a click; although with GTM (Google Tag Manager), you have the ability to track almost any action on your website, from a user opening a particular page to a user viewing a piece of content such as a video.
Conversions
Similar to how Google Analytics creates goals from events, Facebook does exactly the same. You will need to first push events back to Facebook before you go ahead and create conversions.
By telling Facebook when these events happen, you can set up a conversion so every time this action occurs, you will know which campaign or ad has driven this conversion.
If you choose not to track conversions, you won’t have a clear view of how your campaigns are working for you and what your ROI is.
Tracking form completions on your website using GTM
In this article, we’re just going to look at form tracking in particular. Depending on the setup of your website, you may have to set up the event tracking in slightly different ways. Here at Autoweb, we use modal pop-up forms widely across our websites, so if you're running Facebook ads, we'll show you how to track these forms correctly.
Using a 'thank you' page
If your users are re-directed to a ‘thank you’ page when they complete a form on your website, you are in for a much easier ride when it comes to tracking conversions in Facebook.
The current Facebook pixel documentation expects you to have this setup and there’s no need to utilise GTM.
To track a form completion using a ‘thank you’ page, simply follow these steps:
- Navigate to Events Manager in Facebook ads
- Click Create
- Select Create Custom Conversion
- Name your conversion appropriately, e.g. Form Completion
- Keep your Data Source as your current Pixel
- Under Conversion Event, select Lead from the drop down
- Under Rules, define the URL of your thank-you page, e.g. /thankyou
- Click Create
Unlike the next two methods, you don’t need an additional step, so you are ready to start reporting your conversions (see Reporting on Conversions for details on how to do this).
Using an on-page form (no 'thank you' page)
If your users can complete a form on your website but aren’t re-directed to a ‘thank you’ page (a success message may appear instead), you will need to use the GTM method in order to track these form completions.
Setting up Variable
- Navigate to your GTM container
- Find Variables and click Configure
- Ensure all Clicks and Forms variables are checked
- Return to Variables and under User-Defined Variables, click New
- Name your variable Lead Form
- Click Variable Configuration and find Constant
- Name the Value as: Form Submit
- Click Save
Creating Tag
- Within to your GTM container, find Tags and click New
- Name the Tag as: Form Submit
- Click Tag Configuration and find your Facebook Pixel
- Enter your Facebook Pixel ID (can be found in Facebook Ads interface)
- Under Event Name, choose Lead
- Under Object Properties, click Add Property and use the following setup:
- Property Name = lead_type
- Property Value =
- Click Save (you might be prompted to save tag without trigger)
Creating Trigger
- Within to your GTM container, find your Form Submit tag
- Click Triggering to add a trigger
- Click the + button
- Name your Trigger: Form Submit
- Click Trigger Configuration and then Trigger Type
- Under User Engagement, find Form Submission
- Tick Check Validation
- Choose All Forms
- Click Save
Using a pop-up form (modal)
Another option is that you may have a pop-up form on your website. In this case, you will also need to use GTM to track these completions.
In this case, it’s usually the case that the user will see a ‘success’ message rather than being re-directed to a ‘thank you’ page.
Setting up Variable
- Within to your GTM container, find Variables and click Configure
- Ensure all Clicks and Forms variables are checked
- Return to Variables and under User-Defined Variables, click New
- Name your variable Lead Form
- Click Variable Configuration and find Constant
- Name the Value as: Form Submit
- Click Save
Creating Tag
- Navigate to your GTM container
- Find Tags and click New
- Name the Tag as: Form Submit
- Click Tag Configuration and find your Facebook Pixel
- Enter your Facebook Pixel ID (can be found in Facebook Ads interface)
- Under Event Name, choose Lead
- Under Object Properties, click Add Property and use the following setup:
- Property Name = lead_type
- Property Value =
- Click Save (you might be prompted to save tag without trigger)
Creating Trigger
If you want to track clicks on the submit button attached to your form, use the below instructions:
Option 1
- Navigate to your GTM container
- Find your Form Submit tag
- Click Triggering to add a trigger
- Click the + button
- Name your Trigger: Form Submit
- Click Trigger Configuration and then Trigger Type
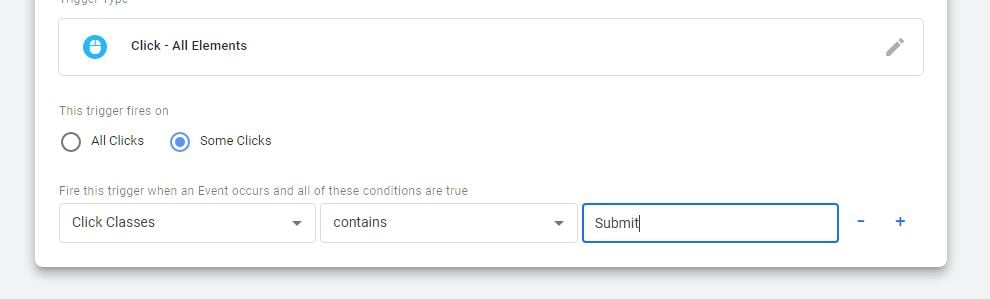
- Under Clicks, find All Elements
- Choose only Some Clicks
- Here, you will need to define how your submit button is tracked. This can be found using the Inspect tool (instructions below)
- Use the drop down and select the Variable you want to define (classes or ID for example) including the identifying text
- Click Save
Option 2
If you want to track only successful form completions, rather than clicks on the submit button, use these instructions:
- Within your GTM container, find your Form Submit tag
- Click Triggering to add a trigger
- Click the + button
- Name your Trigger: Form Submit
- Click Trigger Configuration and then Trigger Type
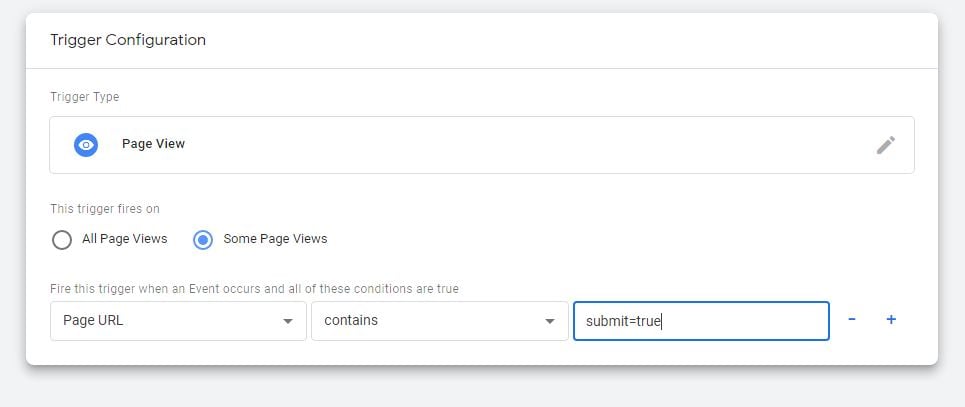
- Under Page View, find Page View
- Click Some Page Views
- Here, you will need to define what your form completion URLs are. This can be found in your Google Analytics account under Behavior - Site Content - Pages. Here at Autoweb, we use the identifier of submit=true to classify a form completion (as seen below).
- Click Save
Using the Inspect Tool to Define Identifiers
Button Tracking
If you’re tracking a submit button, you will need to know what attribution this button code has behind it.
- Navigate to a page which contains your pop-up form and open up the form.
- Using your mouse, right click and find Inspect. This will open up a series of code on the right-hand panel of your screen.
- At the top left of this panel, find and click the mouse button.
- Use this to hover over your submit button.
- Once highlighted, simply click your mouse onto the button itself. You will then see the code in the panel only highlights the code behind this button.

You should see a series of identifiers, including Class and ID. You will need to take one of these identifiers and place into your GTM trigger.
For this example, we will use ‘class’. Copy the text that sits between the >< and place into the trigger in GTM.
Success Message
If your website doesn’t navigate to a ‘thank-you’ page, you will find there’s often a success message that lets the user know the form has been sent successfully.
You can use this message as your unique identifier.
- Navigate to a page which contains your pop-up form and open up the form.
- Using your mouse, right click and find Inspect. This will open up a series of code on the right-hand panel of your screen.
- Fill in the form and press submit.
- At the top left of the Inspect panel, find and click the mouse button.
- Use this to hover over your success message and click.
- You will then see the code in the panel only highlights the code behind this message, including an ID number.
- Copy and paste this into your GTM tag.
Tracking Successful Form Completions
You will need to navigate to Google Analytics and follow these instructions:
- Ensure you aren’t filtering out your IP traffic
- Complete the form on your website
- Using the left panel, find Real Time - Overview
- See which section, you should see the URL of your form
Test Events
You should test your tag and trigger using the preview tools in Google Tag Manager to ensure that everything is set up correctly before submitting your container.
Once you are happy that Google Tag Manager is triggering events correctly, you can send a test event by completing the form.
- Head to Facebook Ads interface
- Navigate to Events Manager
- Click the Test Events tab
- Enter your URL and complete the form on your website
- Return to Facebook and your test event should appear
Setting up Conversions
Once your events are set up in Facebook, you will need to create conversions based on these events, so Facebook knows what is and what isn’t a conversion to you.
For example, someone watching a video may be a tangible action or event to you, but it isn’t technically a conversion as that user hasn’t parted with their data, so you need to define a conversion manually.
You can skip this step if you have used the instruction for tracking a ‘thank you’ page.
- Navigate to Events Manager in Facebook ads
- Click Create
- Select Create Custom Conversion
- Name your conversion appropriately, e.g.; Form Completion
- Keep your Data Source as your current Pixel
- Under Conversion Event, select Lead from the drop down
- Under Rules, find Event Parameter
- Use ‘lead_type’ as your parameter
- Enter the Value of the Event (this can be found in your recently created custom variable in GTM). In the instance of this example, we used ‘Form Submit’
- Click Create
Reporting on Conversions
There’s very little point in pushing these events and creating the conversions if you aren’t going to track them in your reports.
During your event setup, you will have already set your conversions up and defined them as Leads, so you just need to ensure you are reporting on Leads.
- Navigate to Ads Reporting (you may need to create a report)
- Click your report and select the date range you want
- Click Customise
- In the search bar, find Leads
Your Leads will now appear on your report, so you can assign these conversions to your campaigns. If you’ve only just set these up, you will need to wait for data to come through as this doesn’t report retroactively.
If you run a dealership and you’re looking to get started with Facebook ads, speak with our knowledgeable team about how we can help.